
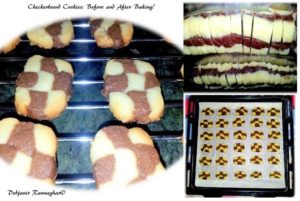
Last minute Christmas baking! I was in a hurry to prepare something special and had really less time since I was a bit busy with office core from last couple of days. And finally decided to prepare a cookie with brain! May be or may not be … to be or not to be... Jokes apart! They are really adorable… tiny, smart, cute Checkerboard Cookies. To be very frank I was not at all confident of making Checkerboard cookies as I thought it's going to be a complicated endeavor… but believe me.. Its super fun to make those...Husband man was a bit curious while observing me drawing something on a parchment before baking! Yes pencil and a scale required for making these cookies…
It came out awesome finally and both hubby and my LO (including me) have cherished Checkerboard Cookies a lot.
Ingredients
- All purpose Flour: 350 g. 2.5 Cup
- Butter in room temperature: 200 g. I have used salted butter (2 Cup)
- Castor Sugar: 150 g. 1.5 Cup
- Vanilla Essence: 2 Tsp.
- Unsweetened Cocoa Powder: 3 Tbsp.
- Egg: 1
- Sufficient Parchment Paper
- Pencil
- Scale
- Plastic Wrap
Instructions
Making of the Dough:
- [url href="https://kitchenofdebjani.com/wp-content/uploads/2015/12/Checkerboard-Cookies-dough-300x200.jpg"][/url]

- Sieve All Purpose Flour and keep it aside.
- Take Butter in a bowl and beat it using an electric mixer in medium speed for around 1-2 minute or till the butter turns creamy in texture.
- Now add Castor Sugar to the butter slowly and start beating in low speed to make a fluffy mixture.
- Separate the egg and add the yolk to the mixture and then add 1 Tsp.Vanilla Essence and beat till the mixture turns into a fluffy, creamy mixture.
- Store the Egg white in a bowl for future use.
- Start adding All Purpose Flour to the mixture slowly and continue beating in low speed to complete the cookie dough.
- Divide the dough into two equal halves and add Cocoa Powder to one part and mix properly using hands.
- Add remaining Vanilla Essence in another part of the dough and mix it well.
- Now cover both the dough with Cling film separately and refrigerate them for around one hour.
- Take two pieces of parchment paper of around 10×20 inch size and draw a rectangle of 5×15 inch in both the parchment paper using pencil and scale.
- Take the dough out of the refrigerator.
- Take any of the dough and try to make a cylindrical structure using your hand.
Shaping the Dough in the form of a Checkerboard:
- [url href="https://kitchenofdebjani.com/wp-content/uploads/2015/12/Checkerboard-Cookies-making-part-1-300x200.jpg"][/url]

- Take one parchment paper and place the dough cylinder on the rectangle drawn and turn the dough it into rectangle by pressing from the upper side.
- Cover the Rectangular dough with the side of the parchment paper and using a rolling pin flatten it properly.
- Refrigerate the Rectangular dough for around 2 hours.
- Following the process mentioned prepare a 5×15 inch rectangle of another portion of the dough and refrigerate it for 2 hours as well.
- Take one portion dough out of the refrigerator and unwrap it.
- Now trim all the sides of the rectangle by around ¼ inch to make the rectangle perfect.
- Using a scale and knife cut the dough into 9 strips lengthwise (one strip should be of around ½ inch thick).
- Following the same process cut another portion into 9 lengthwise strips as well.
- There should be 9 white and 9 Chocolate strips in total.
- Now it’s time to prepare the Checkerboard finally!
- Take the Egg white and slightly beat it to prepare an Egg wash.
- Take a piece of Plastic Wrap place it in the top of a table or Kitchen base.
- [url href="https://kitchenofdebjani.com/wp-content/uploads/2015/12/Checkerboard-Cookies-Making-Part-2-300x201.jpg"][/url]
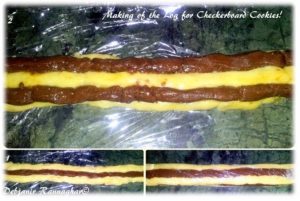
- Take one Chocolate strip and place it carefully on the middle of the Plastic wrap.
- Brush both the open side of the chocolate strip with egg wash and then place one vanilla strip on each side of the chocolate strip and join both the side very carefully.
- Now brush the top of three strips with egg white and place a vanilla strip just upon the chocolate strip and then brush with the egg white just like the lower layer and place one Chocolate Strip on each side of the Vanilla Strip.
- Place final layer of the Cookie dough in an alternate manner and complete making the checkerboard structure.
- Don't brush egg white in the outer wall of the log.
- Now Wrap the Log with the Plastic Wrap and gently press to fill any gap inside.
- Refrigerate the Log for around one hour.
- I have prepared two 15 inch long log.
Baking:
- [url href="https://kitchenofdebjani.com/wp-content/uploads/2015/12/Baking-Checkerboard-Cookies-300x201.jpg"][/url]
- Pre-heat the Oven for around 10 minutes in 170 degree c.
- Take a baking tray and place a piece of parchment paper on it.
- Take one log out of the refrigerator and unwrap it.
- Cut the log into ½ inch sized cookies using a sharp knife. Don't cut into thick pieces.
- Place cookies in the baking tray and give a gap of around 2 inch between the cookies.
- Bake cookies in 170 degree c in the middle rack for around 8-10 minutes.
- Take the cookies out of the Oven and cool them on the Wire rack.
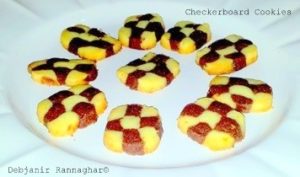
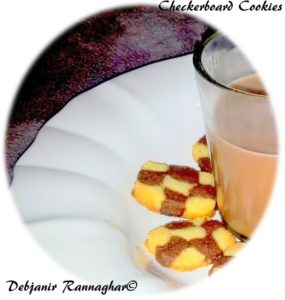
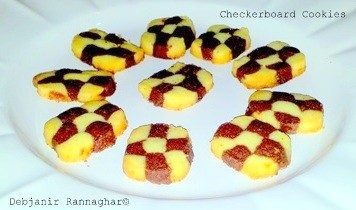
- Tiny Checkerboards are ready to be served.
- Checkerboard cookies can be stored in an airtight container for around 10 days.
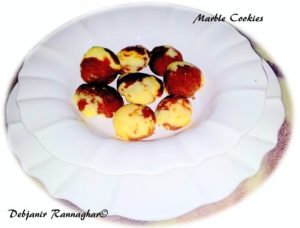
Note: Gather all the extra dough which's separated while preparing the log and make "Marble Cookies" out of it. I've made around 10 Marble Cookies as well.


Leave a Reply